
Memoir44: Operation Chariot
Author:
Lutz Pietschker
Version: 2006-02-26
Games
|
Memoir44 House Rules
|
Home Page
|
Links
|
What's New
[France] Operation Chariot
The Raid on Saint-Nazaire, 28-March 1942
This scenario was inspired by historical events that were simulated in the Avalon Hill Game "Raid on Saint-Nazaire". For details and pictures about the game and the historical raid please see my
"Raid on Saint-Nazaire" web page and my Operation Chariot bibliography.
The scenario was only playtested solitaire. I would be interested in reports about game balance, problems during play, rule problems etc. See
Designer's Notes
for revision information.
There is a problem with this scenario: It can not be set up with the terrain tiles provided in the game and its expansions. For more information please see the set-up section, below. Also, not enough "Royal Engineer" shields are provided in the game; please use alternative shield tokens (or other figures, if you have) of your choice for the demolition squad units.
Historical Background
1941 the Royal Navy had sunk the German battleship "Bismarck"- but just in time before the damaged ship could reach Saint-Nazaire, at the mouth of the Loire in Southern Brittany, for repairs. The "Forme-Ecluse Louis Joubert", also known as the "Normandie Dock", was the only dry dock on the German-occupied Atlantic coast big enough to repair a ship like this. The British knew that the sister ship of "Bismarck", the "Tirpitz", was still in Norwegian waters and getting ready to sail. What if the Normandie Dock could be destroyed- wouldn't this cause the Germans to give it a second thought before bringing "Tirpitz" into the Atlantic, without a chance to repair her in case of serious damage? A commando operation was planned to achieve just this. The plan was to ram the dock gate with a destroyer packed with explosives, to be ignited by a time-fuse. To make sure, demolition squads would blow up the dock machinery like pumps and winding gear. And while they were there, additional commandos could try and destroy other locks and bridges, plus targets of opportunity.
The plan said that, task accomplished, the boats would take the destroyer's crew and the commandos back to England.
On March 26th, 1942, the motley flotilla of motor launches, torpedo boats and the destroyer Campbeltown left Falmouth - 19 ships and 600 men, plus escort ships. At 01:34 on the 28th the Campeltown struck the dock, and the motor launches began to disembark the commandos. It is at this point that the scenario begins.
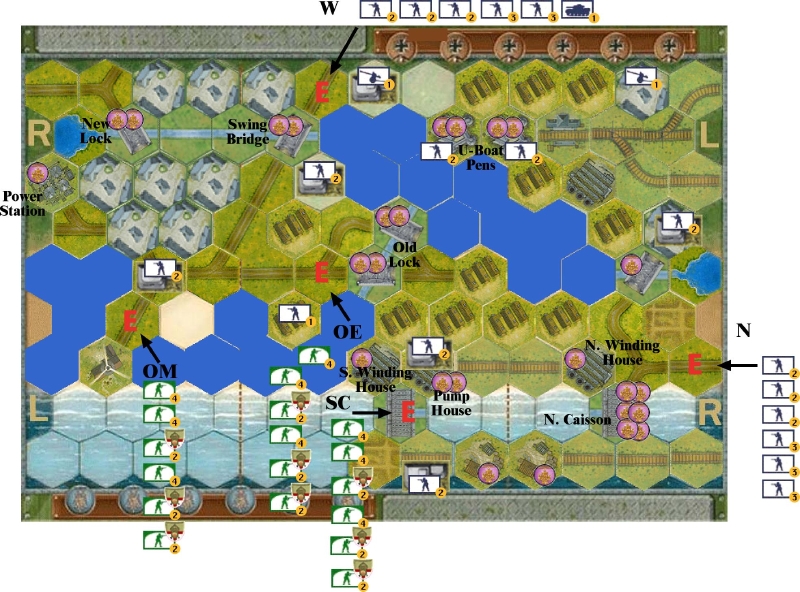
Set-Up
Terrain used:
-
2 x High ground (counts as open ground)
-
9 x River, straight
-
2 x Lake with river
-
20 x All-water (see below)
-
10 x Town/village
-
12 x Barracks (representing store houses, see below)
-
1 x Power plant
-
1 x Lighthouse
-
2 x Factory
-
2 x Fuel dump
-
8 x Road, straight
-
3 x Road, Y
-
4 x Road junction (2 left, 2 right)
-
2 x Road bend
-
5 x Railway, straight
-
2 x Railway junction (1 left, 1 right)
-
2 x Railway bend
-
1 x Railway station
-
2 x Fortress
-
6 x Bunkers
-
5 x Bridges
-
2 x Pontoon bridges (representing dock "caisson" gates)
Tile replacement suggestion:
The blue all-water areas can be simulated by any water tiles. However, the board looks a lot better if you cut the areas from blue cardboard to cover the board's original terrain: Assemble a few tiles on the cardboard in the desired shape, mark the outline with a pencil, and cut it out.
The set-up uses far more barrack hexes than provided with the game. Since no special rules are in effect for "building" areas (all town, barracks, station, factory and power plant tiles are treated as "town/village" tiles for game purposes), replace missing tiles with any tile that suggests a built area.
The two fortress hexes represent the massive U-Boat pens, then still under construction. They follow the standard Terrain Pack rules for fortresses.
Of course you can, as I did, simply use the
VASSAL M44 module
to play (this is a slightly modified version of the
original module
by Stan and Carl Hilinski and Bill Bennett). You will find the scenario in the File/Scenarios/Extra Scenarios menu of the module.
Bridges
represent swing bridges, lock gates and the two "caissons", the massive gates of the Normandie dock. They count as open terrain.
Queued Entry:
All British and many German units enter the game from queues formed at certain entry points. This represents the fact that the British units had to disembark, one by one, at relativley crowded landing places, and that the Germans had to be alerted and brought in from the garrison quarters.
The British entry queues are at the "Old Mole" (OM), "Old Entrance" (OE) and "Southern Caisson" (SC). The German entry queues are on roads in the "North" (N) and "West" (W). Each queue is considered to be in the board section its entry hex (labelled "E") belongs to.
The German player must use the queues as arranged in the set-up image above. The British player is allowed to re-arrange the units in each queue once before the game starts, but he may not move units from one queue to another.
An order can only be given to the one unit that is at the head of each queue when the player's turn starts. Implicitly, this means that only one unit per queue may act in one player turn.
The British units at the heads of the queues are considered to be onboard, in the Ocean hexes marked "OM", "OE" or "SC", all other queued units are considered offboard.
The orders that can be given to a unit at the head of a queue are restricted:
-
German units must enter the board before they can act normally, so the first part of their order must be a move to the queue's entry hex "E", which counts as a 1-hex-move (they may
not
use road movement on their entry turn). After that, they may continue movement, battle etc. as by the normal rules.
-
British units may be ordered to move to their queue's entry hex "E" (a normal 1-hex movement); from then on, they may continue movement, battle etc. as by the normal rules. They may also be ordered to battle, but have a reduced firing strength of 2-1-0 because they fire from their boats.
Briefing
The British player plays with 5 cards and has the first turn.
The German player starts the game with 2 cards. A the end of the turn the German tank enters, he draws 2 replacement cards and then plays with 3 cards for the rest of the game (even if the armor unit is eliminated later).
Conditions of Victory
Victory points are awarded
only to the British player. Each "Victory Cross" token earned by a successful demolition counts as one (1) victory point. In addition, each
figure
of a unit withdrawn by the special "British Withdrawal" rule (see below) counts as one-half (0.5) victory point. However, withdrawal points are only counted towards the end result
if at least 8 victory points
have been awarded for demolitions.
Since the game will only end when no British unit is left on the board, the German player must try to eliminate the British units before they can score too many victory points, i.e. his task is (as it was historically) to minimise the British score.
No victory points are awarded to either side for unit elimination.
The game can be played competitively in two ways:
-
Play two games and swap sides; higher British score wins.
-
The British player wins if he has accumulated
16 or more
victory points after his last unit has been withdrawn or eliminated.
Special Rules
The following
Tactics Cards
have special functions or need commenting:
-
Air Power:
Use as a "Barrage" card: "Target any 1 enemy unit. Roll 4 Battle dice, ignore any terrain battle dice reduction. Score 1 hit for each die matching the unit's symbol or grenade. For each flag, retreat 1 hex. Flags may not be ignored."
-
Artillery Bombard:
Artillery units may not move (see below). Otherwise, use the card as printed.
-
Medics and Mechanics:
Britsh demolition squads may not be built up to a strength greater than 2. The German tank may not be repaired. Otherwise, use the card as printed.
All-water and Ocean hexes
may never be entered, except by the "British Withdrawal" rule (see below).
All British units
(including the demolition squads, see below) are special forces (commandos); they may move 1 or 2 hexes and still battle. In addition, they are not compelled to stop when entering a town/village hex (this reflects their thorough training and terrain studies), but they still may not battle from a town hex just entered.
British units marked as engineers
are commando demolition squads, specially equipped and trained to demolish dock facilities, but only very lightly armed. They are treated like all other British units except that
they fire at 2-1-0
only.
Eliminated German infantry units
come back into play as full-strength (4) units
at the end of one of the German entry queues, so the German player will never run out of units. To decide which queue a unit goes to, roll a die or toss a coin: "Even" or "Head" means that the unit will enter again from the West, otherwise it lines up to re-enter from the North. The unit must re-enter play by the queueing rules described in the set-up section above.
German Artillery units
may
not
move (they represent flak guns on rooftops), but fire normally.
In addition, they may fire with "1" strength at any open ground hex on the board. Open ground includes any hex that is not built terrain (e.g. high ground, beaches, roads, rails and bridges/lock gates/caissons, even if a bunker is in the hex). They can
not
hit units waiting in queues because these are, in the sense of this game, not yet "on the board".
The artillery next to the German entry point "W" represents a flak position on top of "le frigo", a cold storage situated in otherwise open ground. Contrary to normal rules, German units (only) may pass through this hex, but may not stop their movement in it.
Retreat:
The British must retreat not towards their board edge, but towards either the entry point "Old Mole" or the "Old Entrance". Any move shortening the distance to the nearer of these points and
not
shortening the distance to the attacking unit is a valid retreat. A British unit that is on an entry point and has to retreat further must take casualties instead.
All German units retreat normally, towards the "Western" board edge.
Demolition:
British units must destroy certain dock facilities to gain victory points. The demolition procedure is this:
-
A unit trying to demolish a target must be in the target hex. It does not suffer any ill effects from the demolition result.
-
Demolition attempts count as "Battle" actions, i.e. they can only be performed by units ordered to battle or allowed to battle by a Tactics Card. Demolition may
never
be attempted if the unit moved in the same turn, but some cards may allow it to move after the attack. Any card that allows a unit to battle (including "Firefight", "Behind Enemy Lines" etc.) also allows a demolition attack if its other conditions are fulfilled, and any other advantage the card mentions (like additional battle dice) is also given.
-
To attack a target,
-
an attacking demolition squad unit rolls
two
dice per remaining figure. Any Grenade or Battle Star result rolled destroys the object; any other result does no damage.
-
any other British units may also attempt demolition attempts, but rolls only
one
die per figure in the unit and destroys the target only on the roll of at least one Battle Star.
-
When the unit destroys the target, the British player is awarded the Victoria Cross tokens placed on the target. The tokens are never lost, whatever happens to the unit afterwards.
-
When bridges, lock gates or the Northern caisson are destroyed, the bridge marker is removed, thus eliminating this crossing point. The attacking unit is placed in one adjacent hex of the player's choice.
If all adjacent hexes are occupied, the attacking unit is eliminated.
-
The northern caisson is a special case. The Victoria Cross tokens on this target are arranged in three 2-token-stacks. If a demolition attempt succeeds, the player is awarded one of the stacks. The other stacks can be earned by repeated attacks (one per turn). The caisson is only destroyed and removed after the last stack has been removed.
-
Each unit has an unlimited number of demolition attempts. Previous success or failure does not influence later demolition attempts by the same or any other unit.
British Withdrawal:
The British player may, at any time, withdraw units to save them and gain withdrawal victory points (see "Conditions of Victory", above). Withdrawal is possible in two ways:
-
Move a unit off the game board via any hex of the Northern or Western edge. The move from the last hex on the board to offboard counts as a normal 1-hex-move.
-
Move a unit from either the "Old Mole" or the "Old Entrance" entry point (the hex marked "E") into the water. However, the moment a unit withdraws from an entry point, any remaining unlanded, queued units of
that
entry point are immediately eliminated from the game (i.e. the withdrawal "closes" this landing zone). No victory points are awarded or lost for the eliminated queued units.
Only
one unit per turn
may withdraw from each entry point.
A withdrawal can not be used as, or instead of, a retreat. A withdrawn unit can not enter the game again.
Designer's Notes
The
scale
of this scenario is about 70 metres per hex. One unit figure represents about 5 men. Here is an impression of how the map is overlayed on a contemporary map of the town:
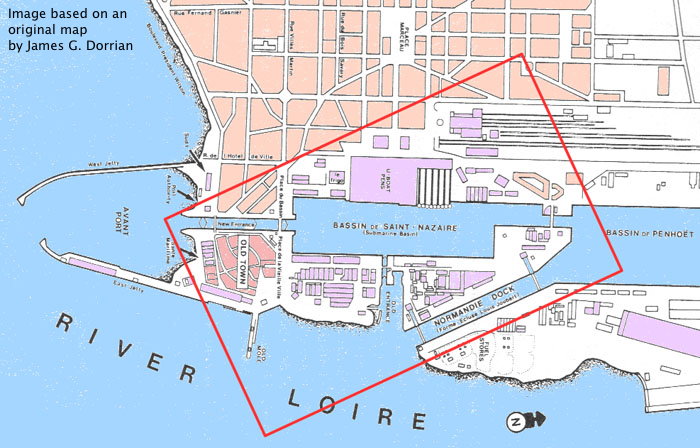
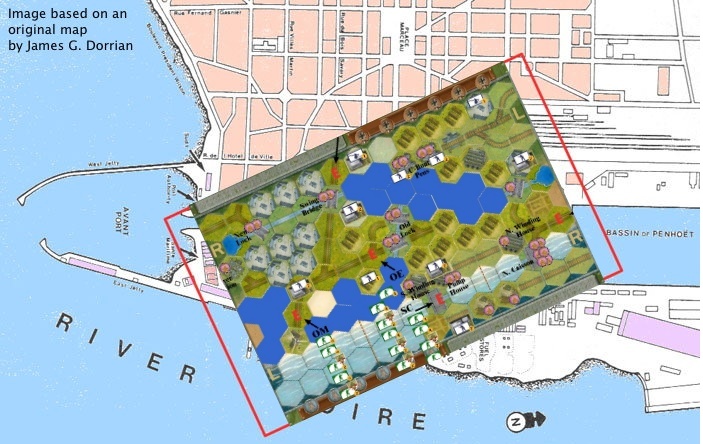
Images with friendly permission by James G. Dorrian, "Storming St. Nazaire", ISBN 0-85052-419-9
The roads pointing to the South side are meant to lead to the jetties that embrace the "avant port", the sheltered roads to the "New Entrance" lock.
The German armor unit represents the first armored cars to arrive in the harbour area and the moment the Germans re-gained some of the initiative, hence the increase of the german card hand. Incidentially, this also marks the point where the historical operation had definitely gone askew- if raiders lose surprise and initiative and have to slug it out against regular forces, you can assume that their plan has been too ambitious, or that intelligence was bad.
Revision History:
-
2006-02-23: First Prototype.
-
2006-02-24: Changed victory conditions (it was to easy for the British to win by withdrawing). Added clarifications about use of certain tactics cards.
-
2006-02-25: Corrected some typos, added Designer's Notes section.
-
2006-02-26: Clarified retreat and "queued entry" rules, added note about limitations of VASSAL scenario file.
Please note that this scenario was not approved by Richard Borg or
Days of Wonder, so you have to check yourself about playability, potential gaming issues, etc.
As the author of this page I take no expressed or implied responsibility for the content of external links; opinions expressed on such pages are not necessarily mine. The web space provider is not responsible for the contents of this page or any linked pages.


Written and published by Lutz Pietschker. Please send comments about technical problems to the
site master.
-Made with a Mac!-
, last change
2011-03-12