
Paper Modelling: Tools
Author:
Lutz Pietschker
Version: 2010-12-31
Paper Modelling
|
Home Page
|
Links
|
What's New
The Tools for Paper Modelling
You need very few tools to start with the hobby. Alas, you can no longer take them with you
everywhere
because knives and scissors are banned from aircraft cabin luggage now, but you come close; a basic toolkit takes no more space that a pocket book, and even a quite elaborate one takes up much less space than, say, Webster's Dictionary.
The cardboard used for paper modelling is generally of a 150 to 250 (typically 170-190) grams per square meter quality and is about 0.2 mm thick. Sheets used
for stiffening structures are
about double that weight (and up to 1 mm thickness). For reference: Normal writing paper has about 80 grams per square meter.
By the way, I use the terms "paper" and "cardboard" interchangeably.
Here is an overview of the tools I use:
Basic Tools,
Other Tools, and
Images of My Tools. Another page gives
practical hints
that may be useful, for example about basing models, and yet another gives an overview of
useful algebra.
Basic Tools
These are the tools you absolutely need. Ok, maybe one or the other is not needed absolutely, but you will miss them if you do not have them. Except for larger scissors, rulers and the cutting mat, all this fits easily into a small toolbox of 20 x 15 x 4 cm. The rest goes into one A4 folder along with the model sheets and some spare cardboard
-
Cutting Mat
Made of soft, "self-healing" plastic, A4 size if travelling, A3 otherwise. You can substitute cardboard, but it blunts the knives and takes up the same space, so why should you?
Some modellers (even publishers) recommend plate glass as a cutting surface. This is OK for scoring, because you need a hard surface for that, but deadly for cutting with a scalpel! You will blunt the scalpel in no time at all and if you are unlucky the glass will break some time along one of the cuts you made.
-
Scissors
One large and straight (12 to 16 cm blades), one small, straight and pointed (3 to 6 cm blades), and maybe one short and rounded (i.e. nail scissors) to cut out interior structures. Never use the same scissors you (or someone else) uses for sewing; paper/cardboard is a very abrasive substance and blunts scissors and knives quickly. For the same reason, use good quality scissors only. They should have a silky feeling when closing them and not show a gap between the blades. Test them on very thin paper
and
on modelling cardboard before you buy! Make one extra test with the pointed scissors: Draw two crossing lines on paper and cut along one line exactly to the intersection point, then do the same along another line. Did the cuts meet exactly in the intersection? If not, was it the scissors' fault, i.e. did it possibly not cut all the way to its point?
If you know that you must use thick (0.8 to 1 mm) cardboard often you may consider to take one sturdy pair of extra scissors for only that purpose.
Easy as it is, people still make mistakes when cutting with scissors. See
a short note on one common mistake.
-
Scalpel/Knife
About half of the cutting I do with the knife, not with the scissors. The knife cuts more precise and can be guided along a ruler; it can also cut out interior forms without the need to bend the cardboard while cutting, and it is easy to make cuts that are exactly parallel to other cuts or to scoring lines. I use a
Martor
knife (another well-known brand is X-ACTO), henceforth named "the scalpel". Whatever brand you use: The blade must not move in the haft
at all, otherwise you endanger your work and yourself! My Martor knife has a haft (#510) and exchangeable blades (I use blades #677 for general work, #680 for finer work, #671 for "punching" and the "cutting needle" #673 for scoring).
A mandatory accessory is a piece of cork to protect the tip of the blade... or rather, yourself from the tip... a scalpel is no tool for children! Recently I discovered that the cork is even more useful if you cut away one section, because that way it also prevents the scalpel from rolling around on the table (see
picture of my workplace; notice the inset picture). I use a second cork to keep the "used" blades, but no matter how you do it, be sure to keep the new, unused blades separate from the used ones, or the day will come where you only have used blades in your toolbox. If you ever feel that the cutting is not as easy or as clean as you would like it, chances are that you work with a blade that is beyond the best age.
-
Blunt knife or needle
This is used for scoring the cardboard along the folding lines. This tool is, more than any other, a matter of heated discussion among modellers Proposals as to what is the ideal scoring tool include pins, compass tips, spent ball-point pens, knives and what not.
One thing is sure: In most cases, you do not want to cut the paper when scoring, definitely not when the folded edge will be visible later. Rather, you want to compress the cardboard to give it a "preferred line of folding" when applying sideways pressure. Here's my very personal opinion on the topic:
-
If you have an old, good-quality
kitchen knife, in use at least 20 years and never sharpened, it will probably have the right kind of rounded edge that will score the paper but only cut it when you really want it to (i.e. apply extraordinary pressure). I had such a knife but, woe is me, I lost it. I now use a similar knife, blunted artificially, but will never forget the old one. Ok, maybe 20 years from now I will... or if the cutting needle (see below) turns out to be really the ideal tool for the purpose.
-
An embroidering needle may also be very good, but it takes some effort to build a good haft for it. The best solution seems to be the
"cutting needle"
sold by
Martor
(#810, which is equal to needle #673 with haft #510). I have one and the first result seem to bear out the enthusiastic comments from fellow modellers I read in modelling forums. The Martor needle is the only such tool I know of, and it has a small problem: The needle does not really sit tight in the haft. However, this is easily cured by two rounds of Sellotape around the needle.
-
Other scoring tools I have read or heard about:
Ball-point pens
are too thick I think.
Sharp knives
are too sharp, and
sharp pins
will tear rather than score, so they are not the tools for my limited motoric control.
-
Ruler/Set Square
Used to guide the knife or scoring tool along straight lines. You should have at least one 30 cm ruler, preferably made from aluminium and equipped with a steel edge for cutting; a scalpel has no problems to to cut up plastic and even aluminium rulers into most irregular shapes, so you will destroy, by and by, any guiding edge that is not made of steel.
I also use a plastic set square (long edge about 22 cm long) often. Faber makes one with a removable handle that is ideal for travelling. I sometimes have to buy a new one because I used it for guiding the scalpel (against my advice given above) or it is etched away by UHU glue (see below).
I also use a short (15 cm) aluminium ruler. I made brass handles for this one and the 30-cm-ruler to handle them better.
-
Glue
Basically, you have two options:
UHU
(or an equivalent) or water-based white glue (PVA, as used for woodwork). Both are quite permanent when dry (if anything it was UHU that tended to un-bond after many, many years). I use both... that is, all three (see below) as I damn well please, but my "official" recommendation is:
-
UHU
gives glossy smears when applied to the wrong places (which happens often with standard UHU because it tends to draw thin threads of glue), so it requires very careful working. On the positive side, the solvent used in UHU is not soaked up by the paper, therefore UHU does not warp paper (instead, the solvent destroys plastic rulers). I use it only for gluing large areas, for example to double the printed sheets with strengthening cardboard. To press the layers together I use a pressing roll scrounged from a lino-printing set.
-
White (PVA) glue
dries up matt, has good gap-filling quality, can be removed with a moist cloth (or brush) while fresh, but may warp the paper when used excessively or on large, flat structures.
I prefer this
glue (the "Ponal" brand or "UHU-coll") for most modelling tasks.
-
UHU Extra
has all characteristics of UHU except that is easier to apply it at exactly the right places without smearing. I sometimes use it instead of white glue, sometimes for the simple reason that it comes in a smaller tube and therefore easier to have it around when needed.
-
Pins/Needles
Ordinary glass-head pins (not too small, but sharp) as used for sewing; they are needed to mark points on the back of the cardboard, to centre parts on one another and many other purposes. 3 to 5 will do. Sewing needles are needed to apply thread (like rigging lines) to models.
-
Small Clamps/Clothes-Pegs/Paper Clips
Used to fix parts while the glue dries.
Paper clips also have an important secondary use: They are very adaptable pushing/ pulling/ prodding/ cleaning/ transfer tools. There is no reason not to take some of these along.
-
Tweezers
You can't do without them. The one I use most often has crossed-over arms that holds parts by itself, without constantly applying pressure (see
image section, below). If you get such tweezers, buy (at least) two, because they are
so
handy!
-
Hardwood Toothpicks
Used to transfer glue to hard-to-access places, to clean the muzzle of the glue tube, as axles for paper automata and 100 other purposes. I don't know how to do without them. Always keep 10-30 around.
-
Forming Tools and Universal Little Helpers
This means some sticks, knitting needles etc. that enable you to reach where your fingers don't. I usually have some shashlik skewers, a knitting needle, some odd strips of steel and pieces of piping and an old, long screwdriver (2.5 mm blade) with me.
A luxury you won't want to miss once you have it is a putty modelling tool, usually made of wood or plastic, about 20 cm long and with various curved and straight surfaces and edges. You can do wonders with that. Not quite into the same class, but also very good to have, is a bookbinder's tool, the "folder"
(see
image section, below)
. Also to this category belongs the ingenious "rolling tool"
(see
image section, below).
To form rounded parts I carry some strips of neoprene rubber with me. They provide a soft underground on which the cardboard can be neatly rounded with the tools mentioned above.
-
Pencils
Needed to mark parts, take notes, and to colour the cut edges of the cardboard. Do not forget extra leads or a sharpener, and a rubber. I discovered that I also carry a permanent felt-tipped pen (black) with me. Seems that I needed it for a model (the AstroMedia Sextant, I think it was) and forgot to remove it from the kit.
-
Brushes
To colour cardboard edges and areas, but also to apply and remove white (PVA) glue. Actually I use them rather seldom.
-
Sheet Protectors
You need them to keep the half-finished work, otherwise small parts will get lost.
-
Materials
What you also need is some cardboard. It can be used to construct small structures you want to add to the model, to stiffen/strengthen structures and many other uses. I usually have 6-12 A4 sheets with me, some in 170 g/m2
(about 0.2mm) and some in 1 mm strength.
Other materials may be used for specific models, like clear plastic for windows etc. Take some thin plywood or thick cardboard along if you want to use hole punches, it prevents damage to both table and punch!
Other Tools
These tools make working more fun, and some are even needed to achieve certain results:
-
Cyanacrylat ("Super") Glue
Never used to glue things but only to "impregnate" small cardboard parts and threads. The cardboard/thread effectively becomes acrylic and can be sanded, cut, filed etc.
Caution: The cardboard becomes transparent, and the colours change completely! Never use this without testing the effects!
-
Emery Paper/File
To make fine adjustments to parts, especially if impregnated with cyanacrylat glue (see above).
-
Hole Punches
Or hole punch pliers, if you like to carry the extra weight for the pliers with you... OK, for the punches you need a hammer, but I always found one when needed, or some substitute Needed to cut small holes, obviously. I have a set of 1, 1.5, 2,3,4,5,6 mm. Do not forget to take along something to put under the punch when using it, table surfaces can be punched as well as anything else!
-
Pliers
Used to apply force at places where your fingers do not reach, and to grip sewing needles when piercing strong material.
-
Artery clamps
(see image)
I found those at a jumble sale. They are ideal to grip small parts and to fix them while the glue dries. However, they tend to leave marks on the paper because they have a really hard grip.
-
Pressing Roll
Used to press layers of cardboard together when gluing large surfaces. The roll I use is taken from a lino-printing set.
-
Curve Template (Spline)
Some people say they are useful to guide the scoring tool or knife along curves edges. I never used them and doubt that anyone really needs them.
-
Water/Enamel/Acrylic Colours
I usually have a box of water colours with me, but for special purposes other colours may be needed. Aquarell colours are even better, and I am looking forward to employ the 12-colour-set I got for christmas from my wife. Note that no water colour will work on
any
type of glue, so use the colour
before
gluing the parts together! Colour pencils are a substitute, but not a good one.
Acrylic paint and enamel are for special purposes, for example technical models where you need glossy paint. I use them very seldom.
Hint: If you can not decide whether to buy glossy or matt enamel for some purpose, here is some help: You can make glossy enamel matt by mixing it with talc powder. Cheaper than buying two cans of paint! Note that the enamel will dry faster when mixed with talc powder.
-
Teflon Sheet
Useful if you work with glue on surfaces that might be damaged, or if excessive glue could cause parts to stick to the table. I use an A4 sheet, but only seldom. Fibre-reinforced Teflon sheets are sold at hobby shops, they are normally used to iron beads etc. to T-shirts.
That's it. Really no big deal to take this along into your holidays to prepare for rainy days, is it? Ok, of course I was omitting the hard part: To take back the finished (or, worse, half-finished and instable) models back home. You may want to think about
that
before you travel.
And even when you get the models home safely, do not assume that whoever dusts the shelves at home will be pleased to dust off your models, even when you do it yourself. And they get damaged in the process although no one ever did it if you ask. So it is good to take some photos of the finished stuff as long as it looks fresh and good, and generally get into a frame of mind not to take the results too serious. Remember: The real fun is in
making
them!
And here are some images of the tools I use:
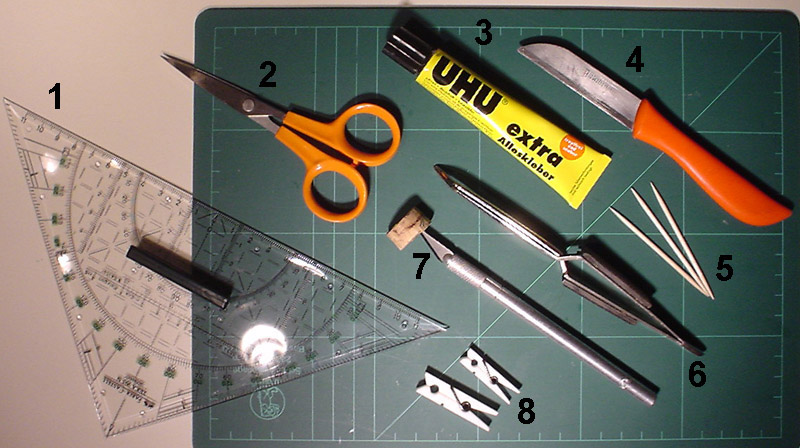
The very basic toolset.
You can do most of the work with these, any you will need every one of them:
-
Set square with removable handle
-
Scissors (pointed, medium size)
-
Glue
-
Scoring knife
-
Hardwood toothpicks
-
Self-gripping tweezers
-
Scalpel
-
Small clamps or clothes pegs
And, unnumbered, the cutting mat on which the tools are assembled.
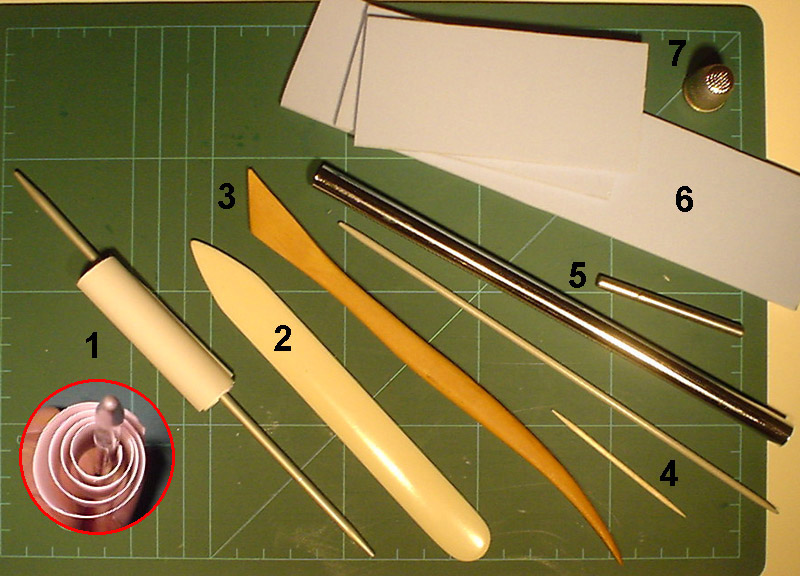
Tools for forming and rounding
-
Self-made rolling tool, inspired by a description on a Polish expert web site: A knitting needle with a strip of thin cardboard attached with adhesive tape and then rolled round the needle tightly. To form small, round parts, just unroll the strip, insert the part, and roll the strip round the needle tightly again. Let the roll spring open, hold vertical and shake to get the part out.
-
Bookbinder's folder
-
Putty modelling tool for forming, pushing prodding etc.
-
Hardwood toothpicks and knitting needle
-
Bits of pipe and round material
-
Neoprene strips to assist in rounding
-
Thimble, also quite useful for some rounding tasks
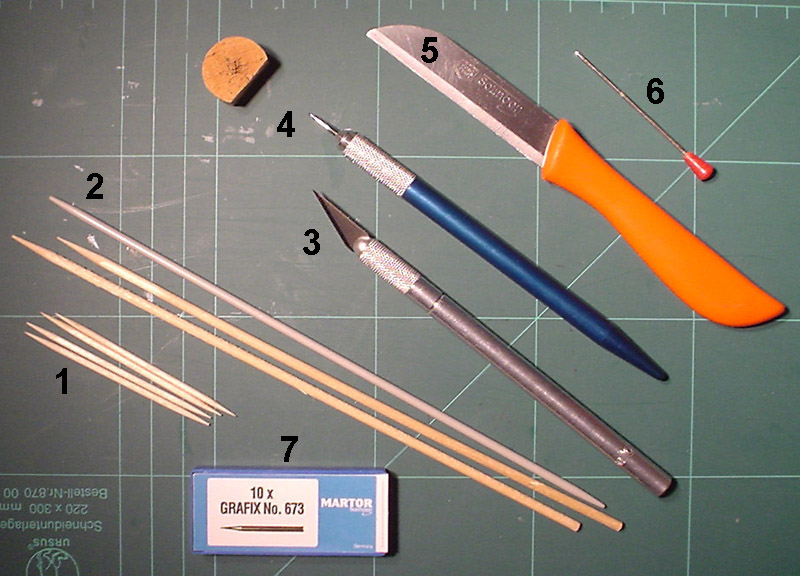
Scoring tools and little helpers:
-
Again, the hardwood toothpicks (so you won't ever forget them)
-
Shashlik skewers and knitting needle
-
Scalpel
-
Martor cutting needle and blade protector cork
-
Old kitchen knife
-
Blunt pin
My Martor scalpel and scoring needle:
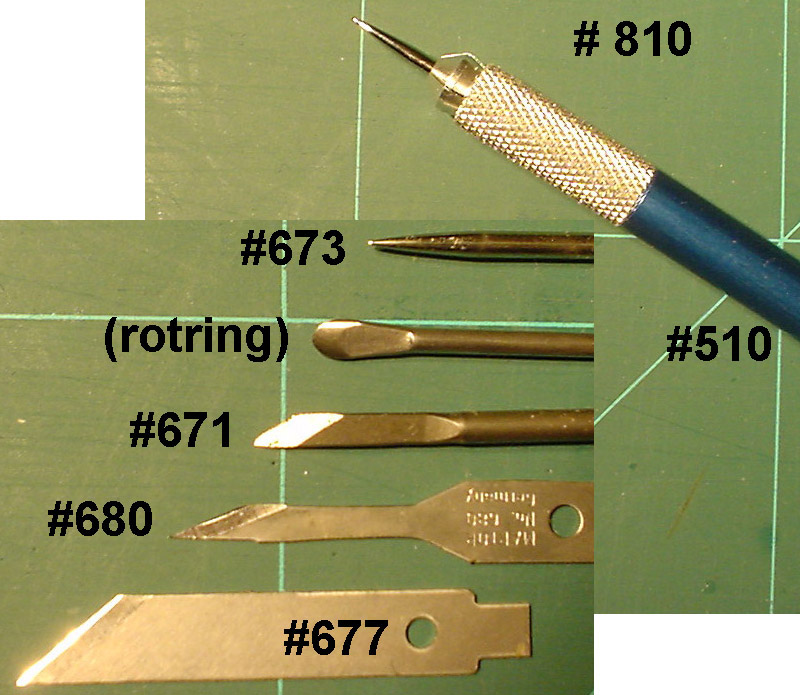
Again in detail (numbers are Martor ordering numbers): The haft (#510), haft with cutting needle (#810), spare cutting needle (#643, 2mm shaft), punching blade (#671, 2.4 mm shaft, these are expensive! The left-hand version is #670 I believe), fine blade (#680), standard blade (#677). The Rotring blade is a cutting blade for compasses with a 2.4 mm shaft.
Hint:
The cutting needle, the compasses cutting blade and the #674 blade fit into standard fall-lead pencils (like the Faber TK9400). However, the pencil is not really built to withstand the forces applied when cutting or scoring, but it may serve as a workaround.
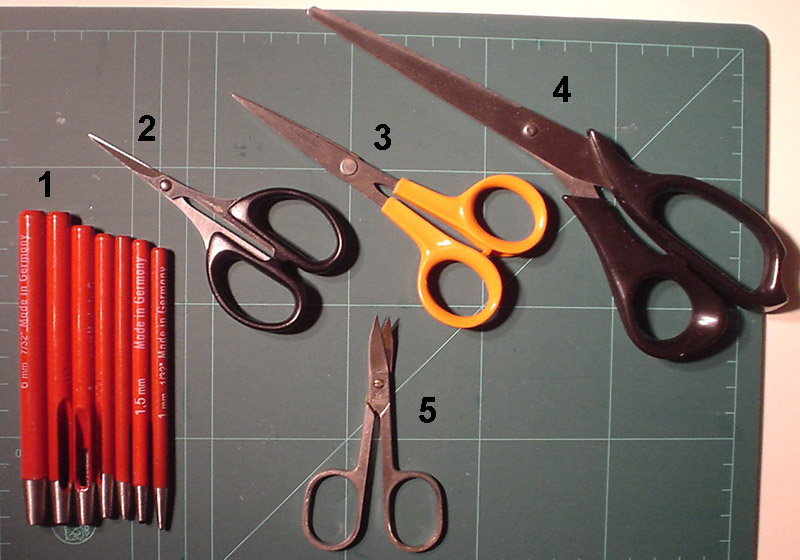
Scissors and hole punches:
-
Set of hole punches (1, 1.5, 2, 3, 4, 5, 6 mm)
-
Silhouette scissors (these were a bit of a disappointment as they do not cut cleanly right up to the tip)
-
Standard mid-size, pointed scissors (Wilkinson made them some years ago, though their current products are not up to their former standards)
-
Larger scissors for straight cutting
-
Nail scissors for concave curves
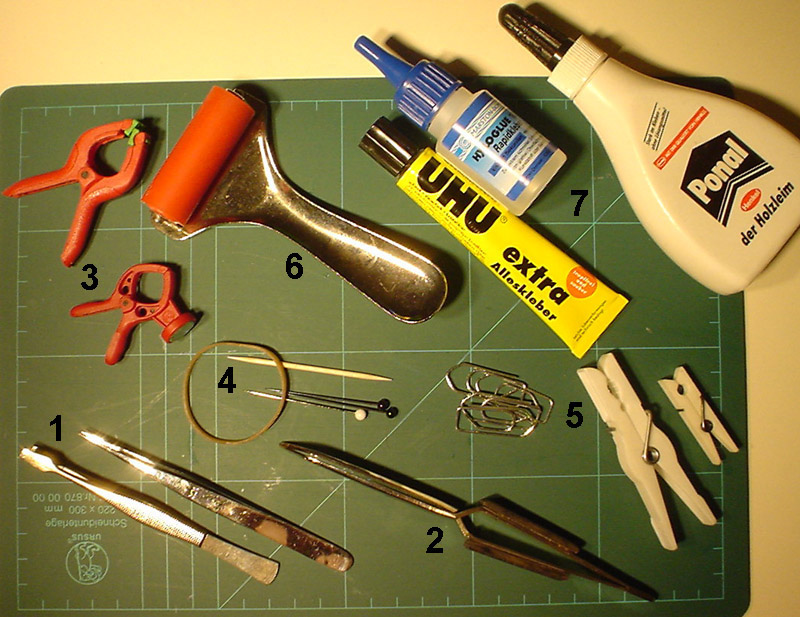
Gluing, holding and clamping:
-
Tweezers
-
Crossed (self-gripping/self-closing) tweezers
-
Mini-clamps, one of them with a magnetic base that is useful to put the part safely away with no risk of it tumbling down, but hell when putting it into the toolbox because it assembles every bit of steel around it.
-
Pins, rubber bands and the inevitable toothpicks (in this context: to apply glue)
-
Paper clips and clothes pegs
-
Rolling press tool, scrounged from a lino-printing set
-
Three types of glue: UHU, cyanacrylat glue and PVA glue. The tube size indicates my preference.
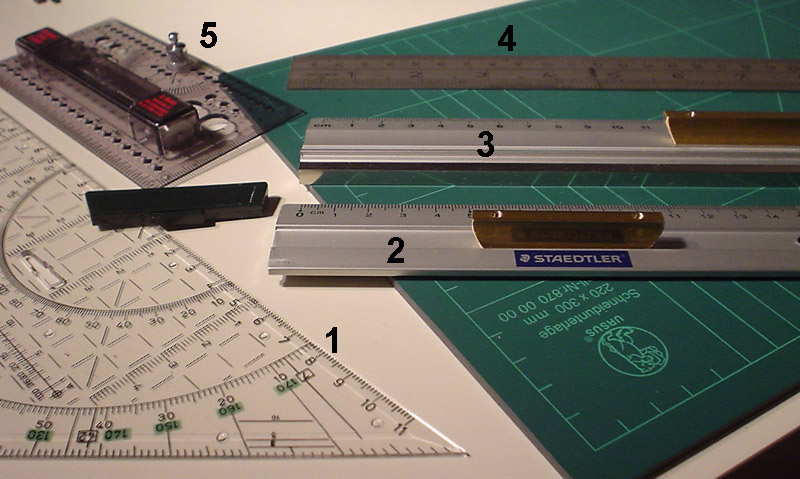
Rulers:
-
Set square (with handle removed)
-
15-cm aluminium ruler, a very handy tool- especially so since I fitted it with a brass handle.
-
30-cm aluminium ruler with a steel cutting edge, also with a self-fitted handle.
-
Steel rules with cm/inch scales, and very good to use together with the magnetic clamps shown above.
-
Universal parallel-lines-circles-angles-and-what-not drawing tool. More details on
my hints page.
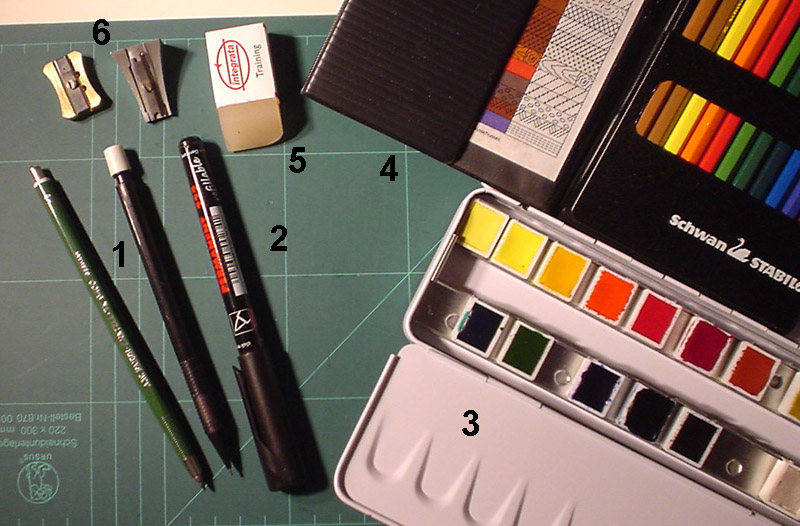
Colouring tools:
-
Fall-lead-pencils (green: the 2.4-mm-lead TK9400 mentioned in the "Martor" section, above; black: 0.5-mm lead for finer work)
-
Felt-tipped pen
-
Set of aquarell colours
-
Colour pencils
-
Rubber
-
Pencil sharpeners for standard pencils and for 2.4 mm leads
Thread and sewing tools:
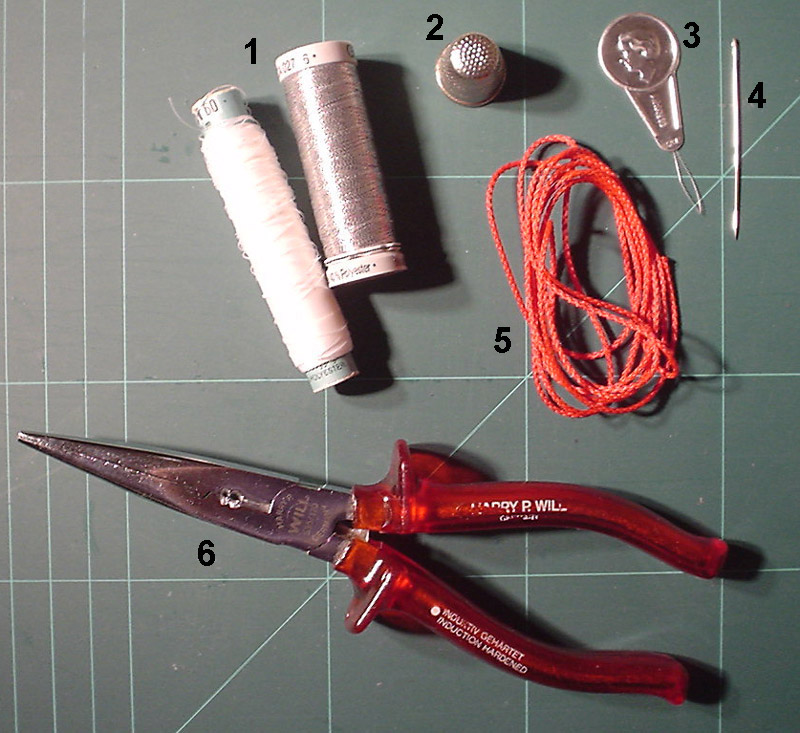
-
Thread, Nylon, different strengths and colours, preferably very smooth (a very thin and smooth thread is sold in hobby shops, originally for stringing glass beads). The silver thread makes good steel cables for ships, railings etc.
-
Thimble
-
Threader
-
Sewing needle
-
Some thicker string, somehow found its way into the box and stayed there
-
Pliers, all-purpose tool for modelling, repairing hotel room electric equipment and-what-not.
The travel box:
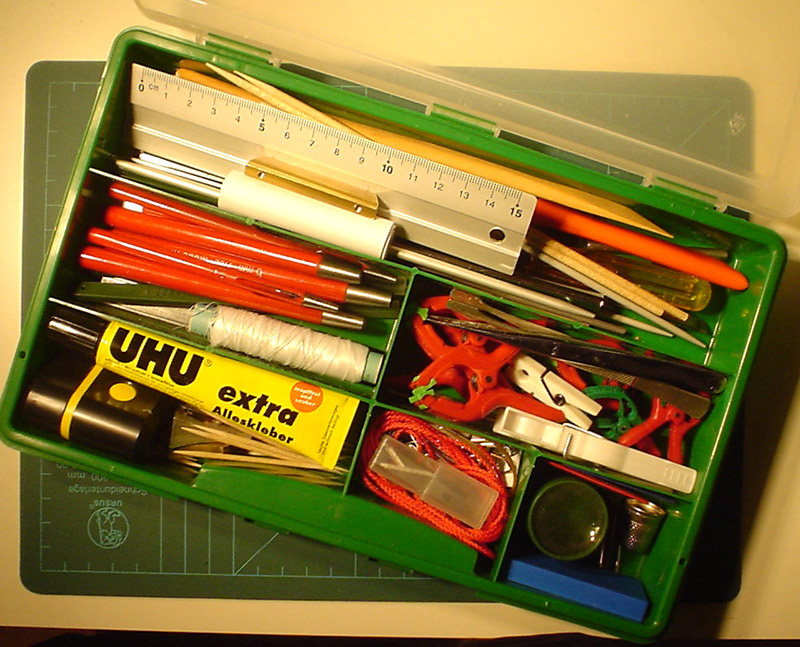
You see, a lot of the tools described above fit into it (which ones do you recognise?), plus
-
Watchmaker's lens (my eyes are not what they used to be)
-
Razor blades (can't remember that I ever needed them)
-
Small lock-makers files for working on edges impregnated with Super Glue
-
Spare blades, pencil leads etc. etc.
As the author of this page I take no expressed or implied responsibility for the content of external links; opinions expressed on such pages are not necessarily mine. The web space provider is not responsible for the contents of this page or any linked pages.


Written and published by Lutz Pietschker. Please send comments about technical problems to the
site master.
-Made with a Mac!-
, last change
2011-03-12